Many product manufacturers provide remote controls with their devices that have toggle buttons on them, e.g. many TV remotes have a single power button, and that same button turns the TV off if on or on if off. This makes it difficult to create automations using the RM Mini 3 that only turn a device (for example) off (and not on).
When my dad got a new TV, he gave me his old (dumb) LG TV. It did not have a working CEC interface so that I could control the power and inputs via HDMI from my Raspberry Pi 3B+, so I set about controlling it from my BroadLink RM Mini 3. The only problem was the toggles. I learned via searching that not only did discrete, single function IR codes exist, but that the information for obtaining and converting those codes in a fashion that was compatible with my RM Mini 3 was mixed and dubious. Most of what was out there related to HomeAssistant, and doesn’t work for Homebridge’s homebridge-broadlink-rm plugin. After days of trial and error, I eventually worked out how to retrieve and convert the codes…
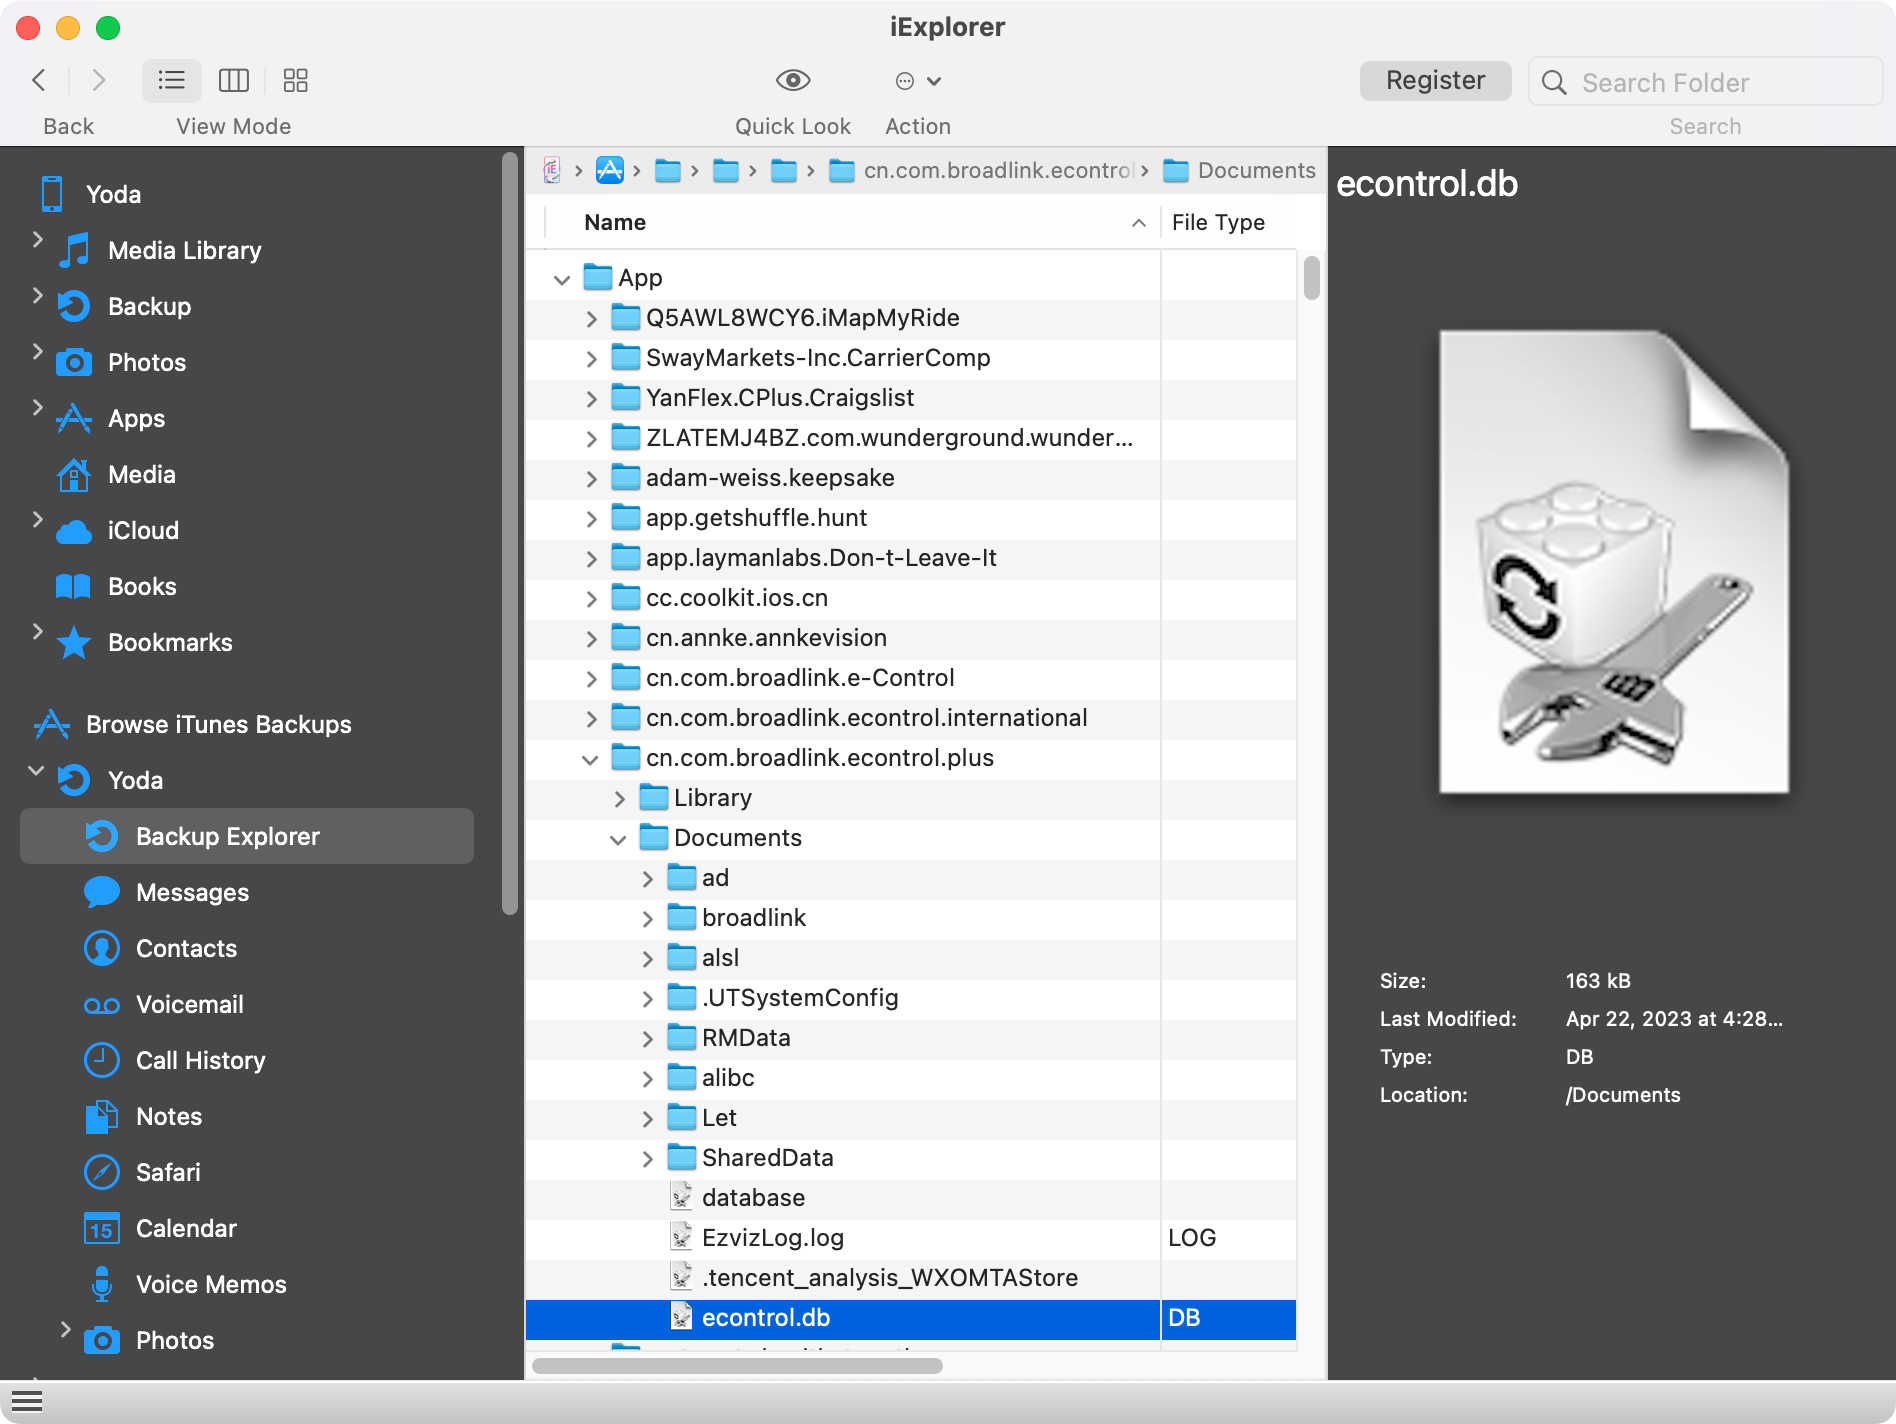
Back in 2020, I posted a procedure I had worked out to extract ALL of the hex codes that had been recorded in a BroadLink RM Mini 3 en masse in order to eliminate the need to re-record every button individually (which could be impossible if the physical remote is either broken or missing).
Well, BroadLink changed the game. They replaced their e-Control app with a new BroadLink app, and the trick I originally used to obtain all of the codes no longer works. I’d received a new red RM Mini 3 for christmas, was unable to set it up using e-Control, installed the new app, and being blissfully unaware of the new limitations, I lazily added codes over some time, thinking I could extract them later when I wanted to create new automations.
Once I learned that I couldn’t use the old trick, I set about figuring out a workaround, and I succeeded. I took notes and commented on the old post that I’d send the raw version of the notes to anyone who requested them, and I have received numerous such requests, so I figured it was time to share them in a new post…
While I will not be reviewing how to get homebridge or the plugin up and running and configured, I will provide a few tips that may save you some aggravation:
If you have multiple RM Mini 3’s, you will need a hosts section at the top level of the plugin’s config and each accessory will need a “host” item with the static DHCP address of the device
Note that even though the packaging of the red BroadLink RM Mini says it is a “3”, it has the same or similar firmware as the RM 4, so you need to add the isRM4 item and set it to true.
You need to “unlock” the mini in the BroadLink app under Home -> <Your Mini> -> ... -> Property -> Lock device
Now, to extract the codes, here is what you need to do…
Login using the same BroadLink account you used with the BroadLink app. (Note, you will see it populate with your devices & codes, but they will not work – that’s OK. All we need is the unencrypted device data.)
On your Mac…
Connect your iPhone to your Mac using a USB/Lightning cable
Click the iPhone in a Finder window’s left pane (Note: iPhone Synching has moved from the old iTunes app to the Finder)
Click “Trust” on the Finder window to trust your iPhone (if prompted)
Unlock your iPhone and tap “Trust” when the dialog appears prompting you to trust your computer
In the Finder window with your phone selected…
Select the General tab in the finder window
Select Backup all of the data on your iPhone to this Mac
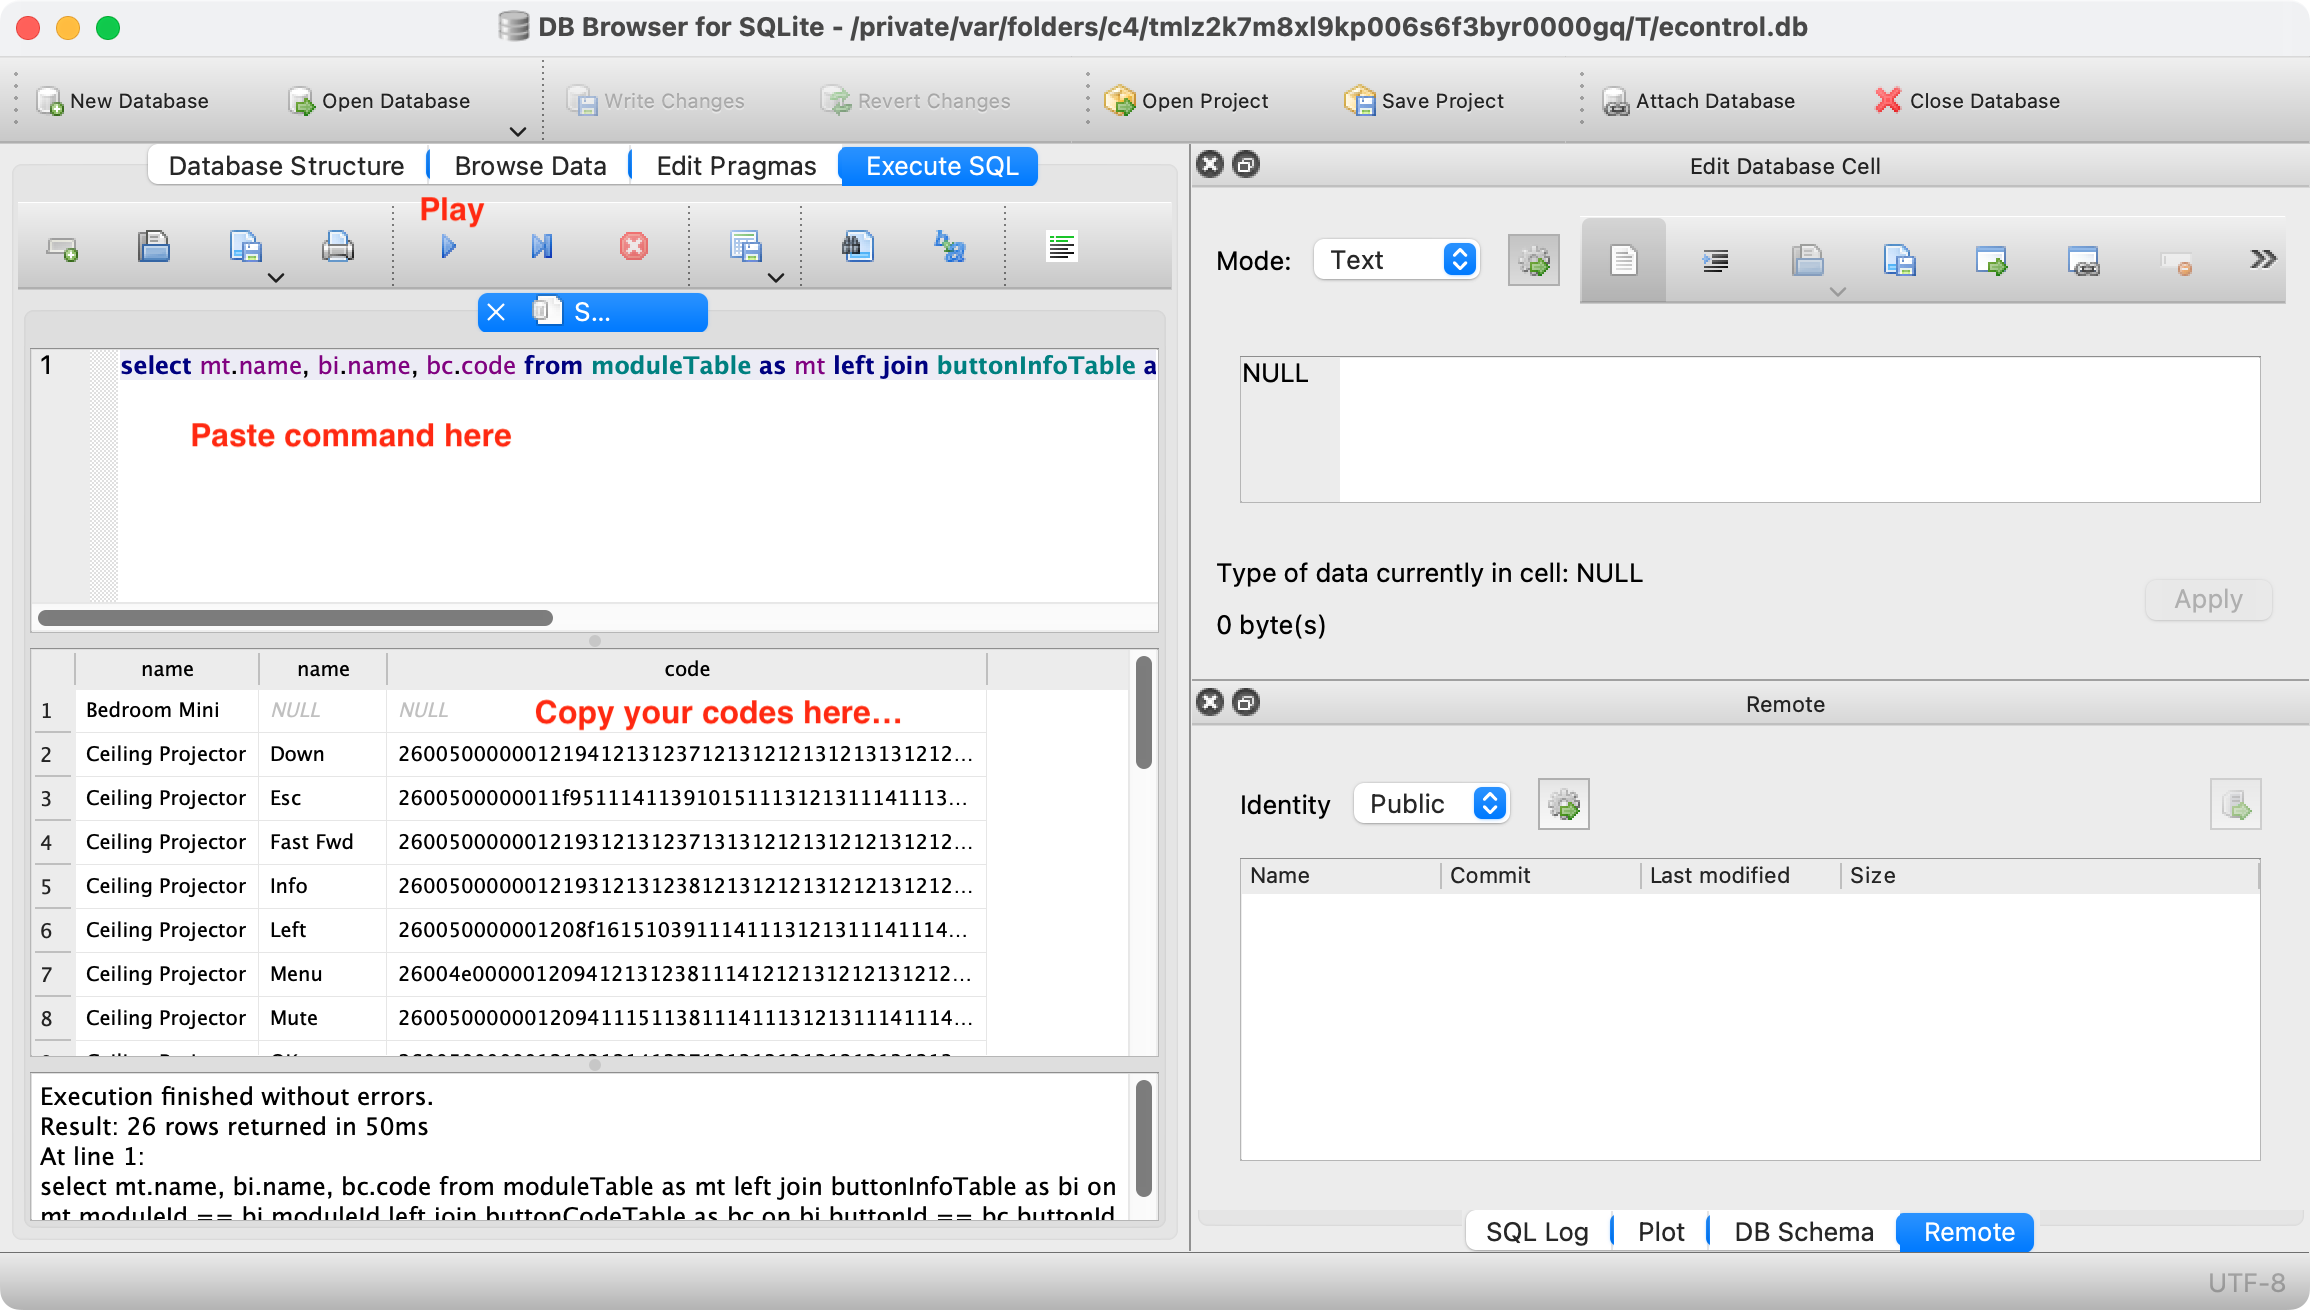
Make sure that the code column is populated. These are your button codes that you are looking for, but they don’t come with the button names. To get every code labeled, we are going to execute an SQL command…
Click the Execute SQL tab
In the top pane, paste this command: select mt.name, bi.name, bc.code from moduleTable as mt left join buttonInfoTable as bi on mt.moduleId == bi.moduleId left join buttonCodeTable as bc on bi.buttonId == bc.buttonId
Click the blue play button
Click in the resulting table in the pane below and copy its contents (e.g. command-a to select all and command-c to copy)
Paste the results into a text file (e.g. using Text Edit.app) or excel document
Use the hex codes in the last column to add accessories to your homebridge config file. (The columns are Remote name, Button Name, Button ID, Code ID, and Hex Code. Note, if you created any combo buttons that send a series of codes, there will be repeated hex codes and Button IDs.)
In your homebridge-broadlink-rm config settings, paste your codes.
Here’s an example of an accessory entry in the homebridge config.json file: