Double-click a File & Have it Open in an X11 App

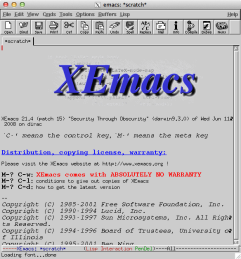
testfinderxemacswindow

If you do a lot of coding (and have been doing so for quite some time like me), you might have an preferred editor that runs under the X11 windowing system.  Personally, I like to use xemacs, though I know a lot of coders tend to prefer plain old emacs.  I have a binary of an x-windows version of XEmacs that I’ve been carrying around since I started coding way back when.  I probably built it originally with Fink – I can’t even remember.  Whenever I wanted to open anything in it, I’d go to the terminal, type my alias ‘xe’ and then drag a file from the finder and hit return. Well, I’ve hit upon an extremely simple way to open XEmacs just by double-clicking a file with a particular extension (e.g. .pl, .pm, .cgi… – I’ve revealed too much about myself with these examples!).  I can’t believe I didn’t think of it before.

The first thing you have to do is create the app:

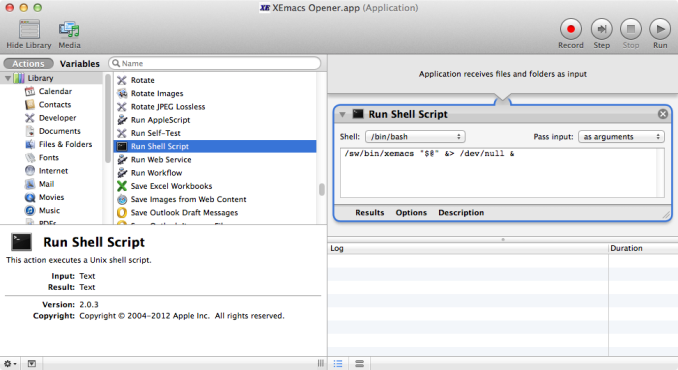
  1. Run Automator.app
  2. Select application
  3. Under the library, drag in “Run Shell Script”
  4. Next to “Shell:”, select “/bin/bash
  5. Next to “Pass input:”, select “as arguments
  6. In the text box, type: ‘xemacs “$@” &> /dev/null &
  7. Select File>Save… (and give it a name)
  8. Next to “File Format:”, select “Application”
  9. Click Save

Example:

XEmacs Opener

A few notes… You can change “xemacs” to whatever command you want to run for a particular type of file.  ‘$@‘ will be replaced with your file that you double-clicked on.  I chose to put double-quotes around this to avoid issues with file paths have spaces in one or more of the directory names, but that also means that I can only open 1 file at a time.  If you’re not worried about directories or files whose names have spaces in them and would like to be able to open multiple files at once, just remove the double-quotes.  Also, “&> /dev/null &” is important.  It basically allows the automator process to exit once the XEmacs window has been opened.  Without it, the automator process will wait for you to close the window and will prevent any other files from being opened in the same way.  Specifically, “&> /dev/null” means send all the output (e.g. errors & status messages from xemacs) to the null file handle (i.e. oblivion).  The last “&” means run xemacs in the background.

Now we can tell the Finder that when it sees a particular extension, open that file with our new app.

  1. Find a file with the desired extension (e.g. “.pl”) & select it in the finder.
  2. Select File>Get Info (or type command-i).
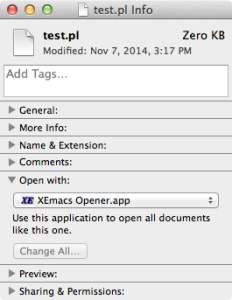
  3. Expand the “Open with:” section (using the little triangle).
  4. Select “Other…” from the drop-down list below “Open with:”.
  5. Find & select your new app (you may need to “Enable: All Applications”).
  6. Click “Add”.
  7. Click the “Change All…” Button beneath the drop-down menu of the get Info window.

getinfo

Repeat this for any other file extensions you wish.  Now, when you double-click a file with one of those extensions, they will open in the X11 app of your choosing!

We can dress up the app by giving it an icon using the Get Info window.  You can paste a graphic that you’ve copied after you have selected the default automator image at the top of the window.  I made my own for XEmacs:

XEmacs_icon

Search Stickies with Spotlight – Hack

Stickies are not searchable by spotlight

I keep a bunch of cheat-sheets & other various notes in Stickies.app, but I have less frequently needed notes in various other kinds of text files and it seemed that whenever I needed to find a certain command that I was sure I’d recorded somewhere, I could never find it.  Well, I discovered the other day that Spotlight does not search the contents of Stickies notes.  I read a lot about it in various blogs.  I even tried to use a set of XCode 4.2 instructions in XCode 6 to create a Spotlight Importer for the Stickies database, but quickly discovered I was in over my head, so I set about constructing a hack to easily save all the stickies as backup text files that would be indexed and searchable by Spotlight.

The catch to this trick is the fact that I have various Sticky Notes bound to specific Mission Control desktops (some of which I hide under the dock with a huge font – to use as desktop labels) and the code for grabbing the stickies content required access to the visible window.  I had first experimented with cycling through the desktops with key code trickery, but discovered a more efficient way – the Window menu item!  Selecting a window in the window menu changes desktops implicitly, so I used the getAppInterface.scpt script (google shows that it’s not out there anymore, so if anyone requests it, I’ll post) to elucidate the menu interface and came up with this script.

set fileName to “”

set stickyNum to 0

set windowMenuListStart to 8

set destFldr to (choose folder with prompt “Choose a destination folder:”) as text

set mydestFldr to POSIX path of destFldr

tell application “Stickies” to activate

tell application “System Events”

tell process “Stickies”

set winMenuList to name of every menu item of menu 1 of menu bar item “Window” of menu bar 1

repeat with winMenuItemNum from windowMenuListStart to (count winMenuList)

click menu item winMenuItemNum of menu “Window” of menu bar item “Window” of menu bar 1 of application process “Stickies” of application “System Events”

delay 0.5

set awindow to name of front window

set noteContent to value of text area 1 of scroll area 1 of window awindow

set stickyNum to stickyNum + 1

set fileName to “stickies” & “_” & stickyNum & “.txt” as string

set theFile to mydestFldr & fileName

do shell script “/bin/echo ” & quoted form of noteContent & ” > ” & quoted form of theFile

end repeat

end tell

end tell

A few notes about the script…  It needed a delay in order for mission control to be able to keep up with the script getting the front window.  If you end up with duplicated and skipped notes, you might need to increase the number of seconds in the delay.

You can only run this script when the screensaver and screen lock is inactive, so putting it in a cron job is not a viable option.  It will cause mission control to change desktops and you may not end up on the desktop you started on when it’s all done.  I tried valiantly to find a way to determine the current desktop number but it looks like that is squirreled away in the code for the Dock and it very difficult to extract.  What you might do to somewhat automate this so that you don’t have to periodically run it manually is use something like ScriptSaver to run the script just before the screen saver comes on.  I have not tried this though and I don’t even know if ScriptSaver is still around.

One last note: if you try to debug an issue by adding dialog windows with messages, note that this will affect the “front window” function.

Once you’ve backed up your Stickies as text files and Spotlight has had time to index them, you will then see search results in the documents section with file names like “stickies_4.txt”.  If you don’t want to wait for Spotlight to do the indexing on its own time, you can go to the Terminal and have it index your newly created stickies backup files with commands like this:

mdimport -d1 stickies_4.txt

The end result is that spotlight searches now show the contents of the stickies you’ve backed up.  The caveat is that you have to occasionally run the script to keep them up to date.  If anyone figures out a better way to do this, I’m all ears – so please comment below.