
We just moved, and in my last apartment, we lived on the second floor and I had my Foscam security camera [~$60] (which is controlled by the Basic version of Sighthound Video [$60]) trained on the only stairwell, which only captured people arriving or leaving. However in our new house, none of the doors are in locations where the camera only captures egress & ingress events. There’s a bathroom right next to one door and the other is between the living room and the stairs. Thus, anywhere I set up a security camera is bound to capture the regular activity inside the house. So I first experimented with setting the rules to make the cameras active during certain hours on the weekdays, which turned out pretty annoying, because my wife’s schedule is random. What I needed was a way to turn the camera rules off & on based on when we arrive & leave the house, the same way I use WeMo to control the window unit air conditioners and the air filter.
I discovered that Sighthound has an IFTTT channel and an iOS app, but their IFTTT channel only has triggers upon motion detection and no “actions” that could be run using Life360 (the app I use to control the AC & filter – e.g. turn on when the first person arrives and off when the last leaves or vice versa). So I emailed Sighthound to see if they had any tips for enabling and disabling camera rules. They pointed me to one of their forums called Hacker’s Corner, where I got pointed in the right direction.
Here’s how to enable your security camera (rule) when the last person in your family leaves the house and disable the camera when the first person in your family arrives.
These are the things you will need:
- A Mac computer that is always running
- A Foscam camera or other IP camera compatible with Sighthound Video [~$60]
- At least the Basic version of Sighthound Video [$60] (The free version of Sighthound Video doesn’t have the necessary remote access settings.)
- The Life360 app [free] on all family member’s phone, in the same “circle”, and with your home recorded as a “place” in the circle.
- Dropbox [free] installed on the Mac computer from #1
- An IFTTT account with the Life360 and Dropbox channels [free]
- A command line utility called curl (which you may need to install by opening /Applications/Utilities/Terminal.app and running `xcode-select –install`) [free]
I will forgo describing how to setup your computer, camera, and all the basic apps/accounts, as they’re all fairly straightforward. I will say, just as some general tips, it’s a good idea to have Sighthound Video save clips in which is has detected motion, in your dropbox, so if your computer gets stolen, you’ll still have footage of the perpetrator. It’s also good to have alerts configure to notify you upon motion detection. Furthermore, it’s good to have the IFTTT app notify you when the rules run, at least for awhile, so you can be sure that the system is working.
Let’s start from the point where you already have Sighthound Video running and your cameras configured for it. I will walk you through enabling and disabling the rule for a single camera. There should be a default rule under the Sighthound Video “Cameras” tab in the bottom left pane. If you don’t already have a 24 hour surveillance rule configured in Sighthound Video for, select the camera you want to rule applied to in the top right corner of the window and create one in the rules pane on the bottom left. Don’t worry about it being set to run 24 hours a day. We will be enabling and disabling the rule based on your location and setting this rule to 24 hours every day simply ensures that when we leave, the camera will be running. I’ve named mine “MudroomSecurity”. If you have it set for 24 hours every day, you’ll see the blue text “Every day – 24 hours” in the middle:

Note that the rule is enabled when the checkbox on the right side is checked. If all rules for a camera are disabled, Sighthound video will no longer record video or issue alerts.
The camera itself may still run and be accessed via its own interface (e.g. typing its DHCP address into a browser on your local network) but, unless explicitly setup for remote access or if your network is open, is not accessible via the outside world.
Note, the precise name of the rule in Sighthound Video is important for what we’re going to do later, so instead of relying on the default auto-generated rule name, let’s create a custom name (without spaces- and case sensitive). Click on the little black downward arrow next to the existing rule and select “Edit rule…”. In the following window, click the “Customize name” link depicted in this example:
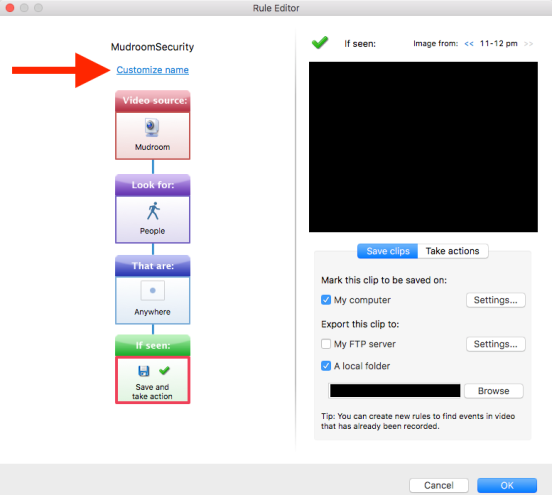
Type in the name you want, copy & paste it somewhere so you can be sure to use the same exact name later, then click “OK”. Click “OK” on the Rule Editor window.
Next, we need to start up a Sighthound Video server that we will be using to communicate with the Sighthound Video app that’s always running in the background (whether the Sighthound Video GUI is running or not).
- Select Sighthound Video->Preferences.
- Check “Enable remote access” (this will only be on your internal network – DO NOT check the “Open this port in my router” option – it’s unnecessary and is a security risk).
- Choose a user ID and password.
- Make a note of the remote access port number (8848 by default) or change it if desired.
- Click “Apply”.
- Click “OK”.
If you did the above correctly, it should look like this:

Note that “External address” is “Not available” and the local address is 127.0.0.1 (we’ll be using this later). At this point, you can quit Sighthound Video if you want. You can run it later just to ensure that your automation is correctly enabling/disabling the rules.
Next, let’s create the 2 folders in Dropbox that will be used to trigger the enabling/disabling of the rule we just created in Sighthound Video. Since I already use folder actions triggered via IFTTT for a number of other things, I keep them organized in a separate folder. For the purposes of this tutorial, let’s create the following folders:
- ~/Dropbox/IFTTT/FolderActions/SecCamsEnable/
- ~/Dropbox/IFTTT/FolderActions/SecCamsDisable/
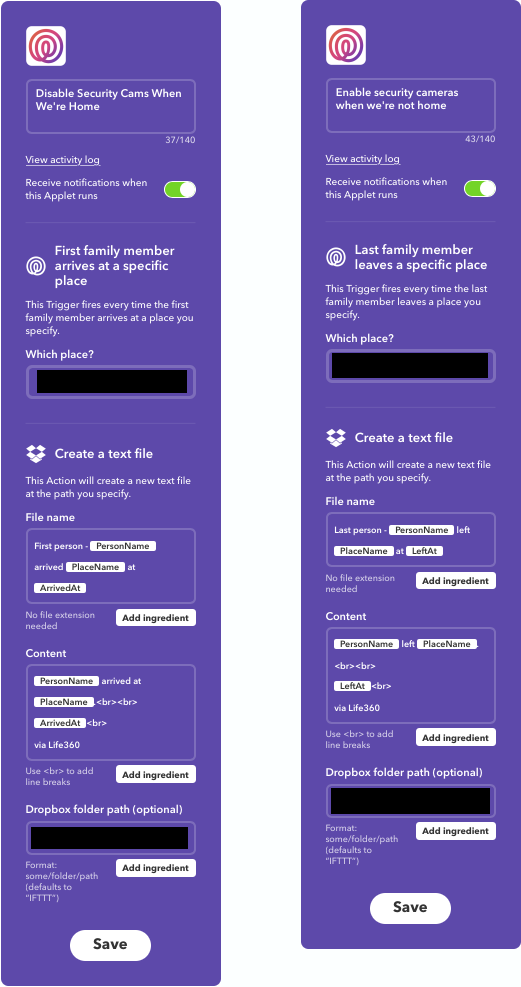
Now, we need to create an IFTTT applet that will create files inside these folders when the last member of your family leaves and the first member of your family arrives. So we’re going to create 2 applets. Let’s create the one that disables the rule first:
- Login to your account on IFTTT.com.
- Click “My Applets” at the top of the IFTTT home page.
- Click the “New Applet” button.
- Click the blue “this” link.
- Select your “Life360” channel.
- Select the “First family member arrives at a specific place” trigger.
- Select the “place” you created for your home in the Life360 app.
- Click the “Create Trigger” button.
- Click the blue “that” link.
- Select your Dropbox channel.
- Select the “Create a text file” action.
- Enter a title as “{{PersonName}} arrived {{PlaceName}} first at {{ArrivedAt}}” to ensure each file is named differently. (Skip the Content section – not important.)
- Enter the disabled folder path under “Dropbox folder path” as we specified above: “IFTTT/FolderActions/SecCamsDisable/”.
- Click the “Create Action” button.
- Click the “Finish” Button.
- If you want to edit the Applet name, use the gear icon on the top right.
Repeat this procedure for enabling cams, choosing “Last family…” in step 6, using “{{PersonName}} left {{PlaceName}} last at {{ArrivedAt}}” instead of “{{PersonName}} arrived {{PlaceName}} first at {{ArrivedAt}}” in step 12, and specifying folder “IFTTT/FolderActions/SecCamsEnable/” in step 13, and you’ll end up with applets that look like this:
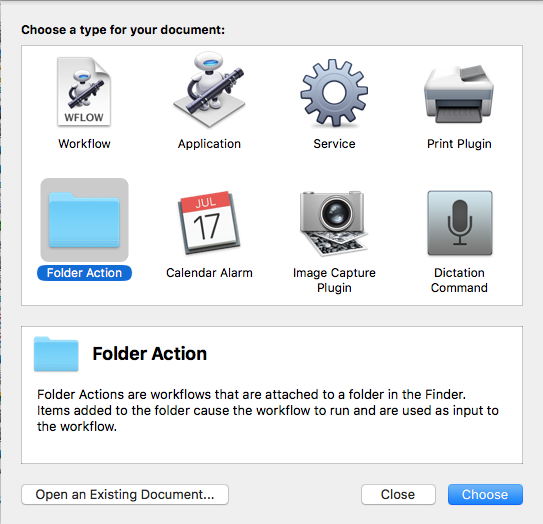
The last, and most important step requires Automator.app in your /Applications folder. Run Automator. We’re going to create 2 folder actions: one to enable, and one to disable the rule you created in Sighthound Video.
- If Automator doesn’t ask when you start it, select File->New to create a new workflow, select “Folder Action”, and click the “Choose” button:
- Drag the “Run Shell Script” action from the middle pane to the workspace on the right:

- Click the “Choose folder” menu and select “Other…” and find your “~/Dropbox/IFTTT/FolderActions/SecCamsDisable” folder
- Click the “Shell” menu and select “/bin/tcsh” (my preferred shell – and what I wrote this example in)
- Select “Pass input” “as arguments” (though we’re not really going to use this – just preventing open input handles)
- Replace all the text in the text box below with the following code (click to get a version you can copy/paste:

- Enter the info you entered into Sighthound Video earlier in place of “YOUR_RULE_NAME”, “YOUR_USERNAME”, and “YOUR_PASSWORD”. You might also change the port number from 8848 in case you edited it.
- Save your Automator workflow and name it something like “DisableSecCamsOnAdd”
- Quit Automator
- Navigate in the Finder to “~/Dropbox/IFTTT/FolderActions/”
- Right-click the “SecCamsDisable” folder and select “Services->Folder Actions Setup…”
- In the drop-down sheet, select your workflow from step 8 (e.g. “DisableSecCamsOnAdd”). If the sheet does not come down and the workflow isn’t already present in the right pane, click the “+” button under the right pane and select your workflow there.
- Repeat this procedure for enabling the security cams, selecting “SecCamsEnable” in step 3, additionally changing the value of ONOROFF from 0 to 1 in step 7, saving as “EnableSecCamsOnAdd” in step 8, clicking “SecCamsEnable” in step 11, and selecting “EnableSecCamsOnAdd” in step 12.
Now, you should be able to enable and disable your security camera rule when your family comes and goes. To test to make sure it’s working, drag any file into “~/Dropbox/IFTTT/FolderActions/SecCamsDisable/” and run Sighthound Video to ensure that the rule has been disabled. Likewise, drag any file into “~/Dropbox/IFTTT/FolderActions/SecCamsEnable/” to see that the rule is turned back on. Note that the Sighthound Video interface must be refreshed between workflow runs. When the workflow runs, you will briefly see a turning gear on the right side of your system menu bar. Once it has disappeared, simple click the “Search” tab and back to the “Cameras” tab to see that the enabled rule checkbox has been ticked or unticked. Or you can quit and restart Sighthound Video to see the change. Then the rule is disabled and you have no other enabled rules, the preview of the camera will blank out with a message about no active rules.
You can run the code that was pasted into automator on the command line in the Terminal, though you’ll likely have the run the command “tcsh” since Apple’s default shell is bash. Then just paste in your edited code to see if you can enable & disable Sighthound Video rules from the command line.
If you have multiple cameras, there are different options, but the easiest thing to do would be to paste the code into automator twice and change the YOUR_RULE_NAME value to the name of the rule for the other camera (rule names must be unique and each camera must have its own rules). The other “setenv” variables in the code do not have to be pasted a second time if they are not changing for the second camera.
I’d be interested to see if this has helped anyone, so please leave comments. If you run into any issues in the future, let me know.

Thanks! This was super helpful. I’m working on updating the script to also point the camera away when I’m home.
LikeLike
Cool! Please post what you come up with and let me know. I’d use it!
LikeLike
I have a new updated post slated that addresses changes that IFTTT made in behavior that defeat this strategy of turning on/off Sighthound rules. I’ve also updated the script to handle multiple rules for multiple cameras. Stay tuned.
LikeLike
I’ve just set up my Sighthound/IFTTT system using your excellently explained instructions and I confirm that it all works perfectly. Many thanks for this! Instead of using Life 360, I’m using the simple Location service in IFTTT. I have multiple cameras, and found that to get them all to work I have to repeat all the setenv lines for each rule, but this only takes a few seconds with copy & paste.
LikeLike
Great to hear. Perhaps the issues I’ve had have had to do with my account or Life360. IFTTT has been very unresponsive. Basically, IFTTT started adding a colon to their date time string and it caused various issues with my Dropbox sync and the ability to read the files, so I removed the datetime, but that caused another issue: the applet for the last person to leave worked fine, but the one for the first to arrive refused to create a file if a file by the same name was present. Weird that the other applet simply appended a number to make the file name unique, but the other wouldn’t do that… Anyway, I implemented a workaround and a loop to be able to add multiple cam rules. Then I implemented a log file so I could tell when it ran and if it was successful. I plan to post a follow up detailing the improvements and the workaround for those facing the same issue.
LikeLike
You’ve lost me a bit: I know nothing much about computer stuff, I just followed your instructions but used the IFTTT location service rather than Life360. It didn’t work at first but then I updated my Mac’s Dropbox software (v40.4.46) and it was fine. I get text files like this created in Dropbox:
“You entered an area
December 17, 2017 at 01:46PM”
If I go out with my phone and my wife is still at home, then I just turn off the IFTTT applets or the cameras themselves… Life360 looks a bit complicated.
LikeLike
Yeah, you’re fine. I’m just thinking out loud and have a followup blog post I intend to write. I’ve had my own issues with the setup I described in the blog post and have implement work-arounds for those issues. It works for you as described above, so that’s great. The new blog post won’t add anything new/necessary for you, although I did implement a loop, file cleanup, and logging in the newer version, which you might like to take advantage of, if you find that helpful.
Incidentally, Life360 allows you to specify a group of people (they call it a “circle”) and gives you triggers on IFTTT that allow you to trigger an applet when the last person in a circle leaves or when the first person in a circle arrives at a location (which they call a “place”). So if I leave and my wife is still home, the cameras don’t turn on (until she also leaves). She has Life360 installed as well and had to join the “circle” I set up and invited her to.
LikeLike
Thanks! Life360 seems to assume that people always remember to take their phones with them when they go out: this wouldn’t work in my household 😦
LikeLike
Haha! Yeah, that would thwart the strategy. I too have implemented a strategy for manually controlling the cameras for just this scenario (though my wife usually remembers her phone). I made IFTTT buttons to do it that are on my phone’s home screen. All they do is create a file in the same dropbox folders.
I also created a companion script to clean up old video files deposited by SightHound in Dropbox. (I set it up that way as a safety measure so if the computer gets stolen, I can still access the footage of them.) It keeps all the latest files up to a certain cumulative size (or number or age – whichever you specify) and deletes anything past that so it doesn’t fill up your dropbox.
More thinking out loud… It could be that the issues (sync and file reading) I had with dropbox files has resolved itself via an update, as you mentioned you did. I experienced those issues sometime back, perhaps before Dropbox issued an update to address them. Still, the newer version will be a little cleaner, since it doesn’t leave a pile of files behind that you must manually delete from time to time.
LikeLike
Your script to clean out Dropbox videos sounds useful. So does your home screen shortcuts to enable/disable the rules – I too have put these as widgets on my iPhone using IFTTT, but how do you get them on the main home screen, please?
LikeLike
In the IFTTT app, go to your button widget and tap Widget settings. It will be an option called “add to home screen”. After you tap the home screen icon you created, you have to tap the button once once it loads. It’s annoying you have to do it in two steps, but that’s the way they implemented buttons.
LikeLike
Note the widget settings link is a text link, not the gear icon on the top right.
LikeLike
Sorry, I can’t find any text link: the applets I’ve created are IF THIS: ButtonWidget (Red), THEN THAT: Text file to DropBox (Blue). The applets come out as a blue DropBox applets on my widgets page. I can’t find anything in Widget settings other than the gearwheel which just tells me that the link is active.
LikeLike
…got it! Sorry, I’ve been stupid – I was trying on the Mac rather than the iPhone.
LikeLike